Gifts

Gifts
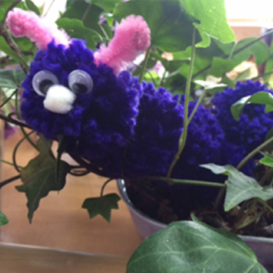
Pom Pom Caterpillar
<div class="default CP-wrapper" id="page-content">
<div class="clearfix"> <!-- Blue Materials Box BEGIN -->
<div id="CP_main-container"> <!-- Final Project Image Begin -->
<div class="cp-subcat-mainimg"><img alt="" src="{{media url=westcottbrand/Pom-Pom-Caterpillar/pompomcaterpillarmain.jpg}}" usemap="2159" title="pompomcaterpillarmain.jpg"></div>
<!-- Final Project Image End -->
<div class="what-need">
<p><strong>What's Needed:</strong></p>
<ul style="font-size:12px;line-height:20px;">
<li>Cardboard</li>
<li><a target="_blank" href="{{store direct_url="products/scissors/kleenearth-recycled-scissors.html"}}">Westcott® KleenEarth®<br>
Antimicrobial Scissors (USA)</a></li>
<li>2 googly eyes or buttons</li>
<li>small crafting pom-pom (or button)</li>
<li>colorful pipe-cleaner</li>
<li>bright yarn</li>
<li>something round that's about 7cm across to trace</li>
<li>pencil</li>
</ul>
</div>
<p style="text-align:center; margin-top:5px;"> </p>
<p style="text-align:center;margin-top:5px;float:left;width:100%;clear:both;"><em>Brought to you by Westcott – The World's Favorite Scissors</em> <!-- Free Scissors Banner Begin --> <!-- Free Scissors Banner End --> </p>
</div>
<!-- Blue Materials Box END --> <!-- Instructions Row Begin -->
<div style="width: 100%; margin-bottom: 20px; float: left;"> <!-- Step 1 Begin -->
<p><strong>Steps:</strong></p>
<div class="cp-subleft-section"><img width="300" alt="" src="{{media url=westcottbrand/Pom-Pom-Caterpillar/pompomcaterpillar1.jpg}}" usemap="2160" title="pompomcaterpillar1.jpg">
<p>1) Take your round object and trace it twice onto your cardboard. I used the round case for my sewing needles for this caterpillar. Cut out your circles. Cut out the center of your circles so that it looks like you have two cardboard donuts!</p>
</div>
<!-- Step 1 End --> <!-- Step 2 Begin -->
<div class="cp-subright-section"><img width="300" alt="" src="{{media url=westcottbrand/Pom-Pom-Caterpillar/pompomcaterpillar2.jpg}}" usemap="2161" title="pompomcaterpillar2.jpg">
<p>2) Measure out your yarn. You will need about 5 yards per pom-pom. This caterpillar will be five pom-poms long, so cut five lengths of yarn. Place two of your cardboard donuts together. Start winding one of your pieces of yarn around and around, pulling the yarn through the middle each time. Wrap yarn all the way around the cardboard circle until you come back to where you started.</p>
</div>
<!-- Step 2 End --> <!-- Step 3 Begin --> <!-- Step 3 End --> </div>
<!-- Instructions Row End --> <!-- Instructions Row Begin -->
<div style="width: 100%; margin-bottom: 20px; float: left;"> <!-- Step 4 Begin -->
<div class="cp-subleft-section"><img width="300" alt="" src="{{media url=westcottbrand/Pom-Pom-Caterpillar/pompomcaterpillar3.jpg}}" usemap="2162" title="pompomcaterpillar3.jpg">
<p>3) Slide the tip of your scissors in between the two cardboard circles. Carefully snip the yarn all the way around the circle. Don't pull the cardboard circles off yet! Cut a small length of yarn about 30cm long. Take this piece and tie it tightly around the yarn in between the two circles. Now you can pull the cardboard circles off and admire your new pom-pom!</p>
</div>
<!-- Step 3 End --> <!-- Step 4 Begin -->
<div class="cp-subright-section"><img width="300" alt="" src="{{media url=westcottbrand/Pom-Pom-Caterpillar/pompomcaterpillar4.jpg}}" usemap="2163" title="pompomcaterpillar4.jpg">
<p>4) Make four more pom-poms by following these steps. For the last pom-pom, you can wind the pipe-cleaner around the middle and curl the ends to form the antennae. The five pom-poms can be tied together with the ends of the yarn left hanging from tying off the middle of each pom-pom. Your caterpillar is taking shape!</p>
</div>
<!-- Step 4 End --> </div>
<!-- Instructions Row End --> <!-- Instructions Row Begin -->
<div style="width: 100%; margin-bottom: 20px; float: left;"> <!-- Step 4 Begin -->
<div class="cp-subleft-section"><img width="300" alt="" src="{{media url=westcottbrand/Pom-Pom-Caterpillar/pompomcaterpillar5.jpg}}" usemap="2164" title="pompomcaterpillar5.jpg">
<p>5) Glue eyes and nose onto one end of your caterpillar and bend your pipe cleaner to form antennae. Voila! You have a pom-pom caterpillar!</p>
</div>
<!-- Step 5 End --> <!-- Step 6 Begin -->
<div class="cp-subright-section">
<p> </p>
</div>
<!-- Step 6 End --> </div>
<!-- Instructions Row End --> <!-- Footer Text Begin -->
<div style="text-align: center; width: 100%; margin-bottom: 20px; float: left;">
<p>Adult supervision is recommended when children use scissors.<br>
© 2016 Acme United Corporation. Text and design by Marisa Pawelko</p>
</div>
</div>
</div>

Stamped Mini Card
<div class="default CP-wrapper" id="page-content">
<div class="clearfix"> <!-- Blue Materials Box BEGIN -->
<div id="CP_main-container"> <!-- Final Project Image Begin -->
<div class="cp-subcat-mainimg"><img alt="" src="{{skin url="images/Stamped-Mini-Card/stampedminicardmain.jpg"}}" usemap="2177" title="stampedminicardmain.jpg"></div>
<p> <!-- Final Project Image End --> <strong>Summary: </strong><br>
Handmade cards are a thoughtful way to brighten someone's day and show that you care! This quick and easy stamped mini card project makes great use of your paper scraps! Customize the all the little details with colored pencils, sharpened with the Teacher's Choice Award winning, iPoint Evolution Axis pencil electric sharpener!</p>
<div class="what-need">
<p><strong>What's Needed:</strong></p>
<ul style="font-size:12px;line-height:20px;">
<li> <a target="_blank" href="{{store direct_url="catalogsearch/result/?q=15352"}}">Westcott Craft Self Healing Cutting Mat, 12" x 18"</a></li>
<li><a target="_blank" href="{{store direct_url="products/paper-trimmers/rotary-trimmers/westcott-12-trimair-titanium-bonded-rotary-paper-trimmer.html"}}">Westcott TrimAir Premium Titanium Paper Trimmer, 12"</a></li>
<li><a target="_blank" href="{{store direct_url="products/pencil-sharpeners/electric-pencil-sharpeners/westcott-axis-ipoint-evolution-electric-pencil-sharpener-for-home-or-office-15510-parent.html"}}">Westcott Axis iPoint Evolution Electric Heavy Duty Pencil Sharpener</a></li>
<li>The World's Favorite Scissors™<br>
<a target="_blank" href="{{store direct_url="products/scissors/titanium-bonded-scissors/non-stick-scissors/westcott-5-titanium-non-stick-scissor-with-microtip-violet-15130-parent.html"}}">Westcott Craft Titanium Non Stick Scissors with Microtip, 5"</a></li>
<li><a href="{{store direct_url="westcott-6-titanium-bonded-precision-scissors-1.html"}}" target="_blank">Westcott 6" Titanium Precision Scissors</a></li>
<li>Cardstock</li>
<li>Decorative Paper</li>
<li>Rubber Stamp (in the design of your choice)</li>
<li>Blank Ink Stamp Pad</li>
<li>Foam Tape</li>
<li>Colored Pencils</li>
<li>Glue Stick or Glue Runner </li>
</ul>
</div>
<p style="text-align:center;margin-top:5px;float:left;width:100%;clear:both;">Brought to you by Westcott – The World's Favorite Scissors</span></p>
</div>
<!-- Blue Materials Box END --> <!-- Instructions Row Begin -->
<div style="width: 100%; margin-bottom: 20px; float: left;"> <!-- Step 1 Begin -->
<p><strong>Steps:</strong></p>
<div class="cp-subleft-section"><img width="300" alt="" src="{{skin url="images/Stamped-Mini-Card/stampedminicard1.jpg"}}" usemap="2178" title="stampedminicard1.jpg">
<p>1) With the Westcott TrimAir Premium Titanium Paper Trimmer, cut a piece of cardstock that is 5" x 3.5". Next score the piece down the middle using the included scoring blade and fold it in half. Then cut a piece of decorative paper that is 3.5" x 2.5". With a tape runner or glue stick, adhere the decorative paper onto the front of the card. Then stamp your image onto another piece of cardstock, using the Westcott Craft Self Healing Cutting Mat to protect your work surface.</p>
</div>
<!-- Step 1 End --> <!-- Step 2 Begin -->
<div class="cp-subright-section"><img width="300" alt="" src="{{skin url="images/Stamped-Mini-Card/stampedminicard2.jpg"}}" usemap="2179" title="stampedminicard2.jpg">
<p>2) Accent the details of the stamped image with colored pencils. The Westcott Axis iPoint Evolution Electric Heavy Duty Pencil Sharpener gives your pencils a super precise tip, which makes coloring all the little details super easy and convenient!</p>
<!-- Step 2 End --> </div>
</div>
<!-- Instructions Row End --> <!-- Instructions Row Begin -->
<div style="width: 100%; margin-bottom: 20px; float: left;"> <!-- Step 4 Begin -->
<div class="cp-subleft-section"><img width="300" alt="" src="{{skin url="images/Stamped-Mini-Card/stampedminicard3.jpg"}}" usemap="2180" title="stampedminicard3.jpg">
<p>3) Next cut out the stamped image with the Westcott 6" Titanium Precision Scissors. These scissors feature a convenient precision micro tip. Their large handles give you extra cutting control, making them the perfect tool for fussy cuts and getting into all those tight and tricky spots! <!-- Step 3 End --> <!-- Step 4 Begin --> </p>
</div>
<div class="cp-subright-section"><img width="300" alt="" src="{{skin url="images/Stamped-Mini-Card/stampedminicard4.jpg"}}" usemap="2181" title="stampedminicard4.jpg">
<p>4) Cut little pieces of foam tape with the Westcott Craft Titanium Non-Stick Scissors with Microtip. These scissors are adhesive resistant making them ideal for cutting all sorts of sticky materials! Mount the foam pieces onto the back of the stamped image. To complete the project, peel off the paper backing from the foam tape pieces and adhere the stamped image onto the front of your mini card!</p>
</div>
<!-- Step 4 End --> </div>
<!-- Instructions Row End --> <!-- Footer Text Begin -->
<div style="text-align: center; width: 100%; margin-bottom: 20px; float: left;">
<p>Adult supervision is recommended when children use scissors.<br>
© Acme United Corporation. Text and design by Marisa Pawelko</p>
</div>
</div>
</div>
Monogram Bookmark
<div class="default CP-wrapper" id="page-content">
<div class="clearfix"> <!-- Blue Materials Box BEGIN -->
<div id="CP_main-container"> <!-- Final Project Image Begin -->
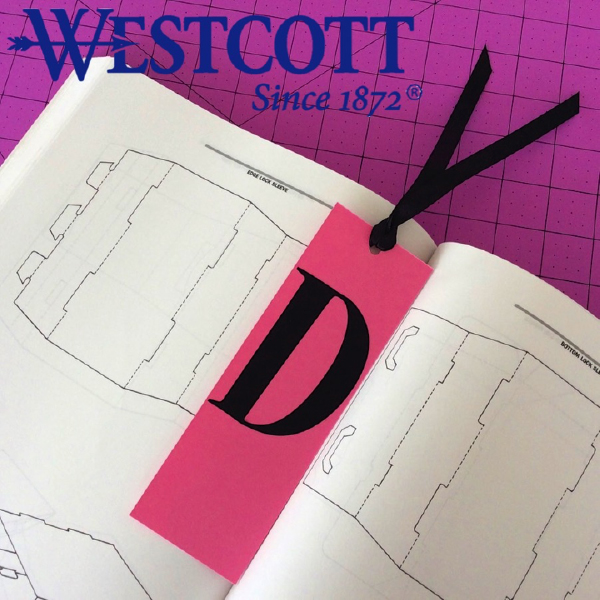
<div class="cp-subcat-mainimg"><img alt="" src="{{media url=westcottbrand/Monogram-Bookmark/monobookmarkmain.jpg}}" usemap="2113" title="monobookmarkmain.jpg"></div>
<!-- Final Project Image End -->
<p><strong>Summary: </strong><br>
This cute monogram bookmark makes the perfect quick gift for your friends at the office! Make it in their favorite color and then customize it with their initial!</p>
<div class="what-need">
<p><strong>What's Needed:</strong></p>
<ul style="font-size:12px;line-height:20px;">
<li> <a target="_blank" href="{{store direct_url="catalogsearch/result/?q=15751"}}">Westcott Trendsetter 8" Straight Zebra Scissors #15751</a></li>
<li> <a target="_blank" href="{{store direct_url="catalogsearch/result/?q=10417"}}">Westcott 18" Stainless Steel Ruler #10417</a></li>
<li>Westcott 12" Titanium Trimmer #13779</li>
<li> <a target="_blank" href="{{store direct_url="catalogsearch/result/?q=15856"}}">LetterCraft Permanent Vinyl Lettering Nueva 3", Black #15856</a> </li>
<li> Colored Cardstock </li>
<li> Ribbon or Yarn </li>
<li> Hold Punch </li>
</ul>
</div>
<p style="text-align:center;margin-top:5px;float:left;width:100%;clear:both;"><em>Brought to you by Westcott – The World's Favorite Scissors</em></p>
<!-- Free Scissors Banner Begin --> <!-- Free Scissors Banner End --> </div>
<!-- Blue Materials Box END --> <!-- Instructions Row Begin -->
<div style="width: 100%; margin-bottom: 20px; float: left;"> <!-- Step 1 Begin -->
<p><strong>Steps:</strong></p>
<div class="cp-subleft-section"><img width="300" alt="" src="{{media url=westcottbrand/Monogram-Bookmark/mb_step1.jpg}}" usemap="2114" title="mb_step1.jpg">
<p>1) Gather up your supplies as shown.</p>
</div>
<!-- Step 1 End --> <!-- Step 2 Begin -->
<div class="cp-subright-section"><img width="300" alt="" src="{{media url=westcottbrand/Monogram-Bookmark/mb_step2.jpg}}" usemap="2115" title="mb_step2.jpg">
<p>2) Measure the width of your letter with the Westcott 18" Stainless Steel Ruler and add an extra 1/2" to this dimension to calculate the width of your bookmark.</p>
</div>
<!-- Step 2 End --> <!-- Step 3 Begin --> <!-- Step 3 End --> </div>
<!-- Instructions Row End --> <!-- Instructions Row Begin -->
<div style="width: 100%; margin-bottom: 20px; float: left;"> <!-- Step 4 Begin -->
<div class="cp-subleft-section"><img width="300" alt="" src="{{media url=westcottbrand/Monogram-Bookmark/mb_step3.jpg}}" usemap="2116" title="mb_step3.jpg">
<p>3) With the Westcott 12" Titanium Trimmer, trim a piece of cardstock to the width calculated in step 2 that is about 7" long.</p>
</div>
<!-- Step 1 End --> <!-- Step 2 Begin -->
<div class="cp-subright-section"><img width="300" alt="" src="{{media url=westcottbrand/Monogram-Bookmark/mb_step4.jpg}}" usemap="2117" title="mb_step4.jpg">
<p>4) Adhere the LetterCraft Permanent Vinyl Lettering to the bookmark. Next punch a hole at the top and run a piece of ribbon through as shown. To finish the project off, trim the ends of the ribbon at a 45 degree angle with the Westcott Trendsetter 8" Straight Zebra Scissors.</p>
</div>
<!-- Step 4 End --> </div>
<!-- Instructions Row End --> <!-- Footer Text Begin -->
<div style="text-align: center; width: 100%; margin-bottom: 20px; float: left;">
<p>Adult supervision is recommended when children use scissors.<br>
© 2016 Acme United Corporation. Text and design by Marisa Pawelko</p>
</div>
</div>
</div>
Monogram Greeting Card
<div class="default CP-wrapper" id="page-content">
<div class="clearfix"> <!-- Blue Materials Box BEGIN -->
<div id="CP_main-container"> <!-- Final Project Image Begin -->
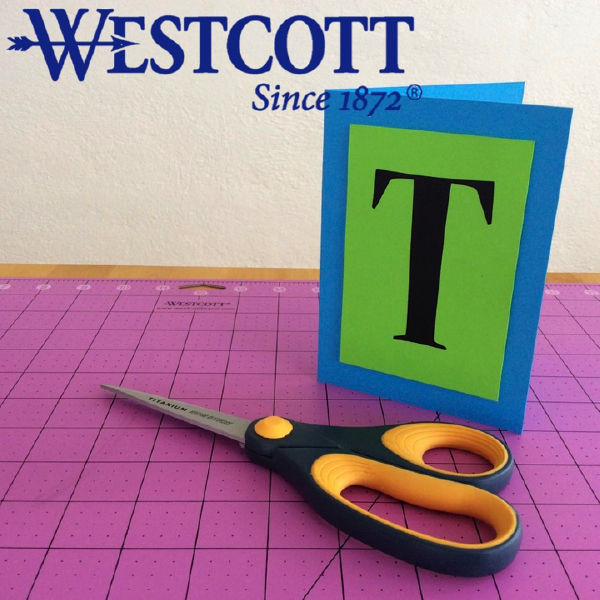
<div class="cp-subcat-mainimg"><img alt="" src="{{media url=westcottbrand/Monogram-Greeting-Card/monogramgreetingcard.jpg}}" usemap="2113" title="monogramgreetingcard.jpg"></div>
<!-- Final Project Image End -->
<p><strong>Summary: </strong><br>
This cute monogram greeting card makes the perfect quick gift for your friends at the office! Make it in their favorite color and then customize it with their initial! Perfect for all occasions, or just because!</p>
<div class="what-need">
<p><strong>What's Needed:</strong></p>
<ul style="font-size:12px;line-height:20px;">
<li><a href="{{store direct_url="catalogsearch/result/?q=14849"}}" target="_blank">Westcott Titanium Bonded Non-Stick 9" Straight Scissors #14849</a></li>
<li><a href="{{store direct_url="catalogsearch/result/?q=10417"}}" target="_blank">Westcott 18" Stainless Steel Ruler #10417</a></li>
<li>Westcott 12" Titanium Trimmer #13779</li>
<li>Westcott Self-Healing Cutting Mat #15352</li>
<li><a href="{{store direct_url="catalogsearch/result/?q=15856"}}" target="_blank">LetterCraft Permanent Vinyl Lettering Nueva 3", Black #15856</a></li>
<li> Colored Cardstock </li>
<li> Foam Tape </li>
</ul>
</div>
<p style="text-align:center;margin-top:5px;float:left;width:100%;clear:both;"><em>Brought to you by Westcott – The World's Favorite Scissors</em></p>
<!-- Free Scissors Banner Begin --> <!-- Free Scissors Banner End --> </div>
<!-- Blue Materials Box END --> <!-- Instructions Row Begin -->
<div style="width: 100%; margin-bottom: 20px; float: left;"> <!-- Step 1 Begin -->
<p><strong>Steps:</strong></p>
<div class="cp-subleft-section"><img width="300" alt="" src="{{media url=westcottbrand/Monogram-Greeting-Card/mgc_step1.jpg}}" usemap="2114" title="mgc_step1.jpg">
<p>1) Gather up your supplies as shown.</p>
</div>
<!-- Step 1 End --> <!-- Step 2 Begin -->
<div class="cp-subright-section"><img width="300" alt="" src="{{media url=westcottbrand/Monogram-Greeting-Card/mgc_step2.jpg}}" usemap="2115" title="mgc_step2.jpg">
<p>2) To create the card use the Westcott 12" Titanium Trimmer to cut a piece of cardstock that is 5.5" x 8". Next use the scoring blade to make your fold in the center.</p>
</div>
<!-- Step 2 End --> <!-- Step 3 Begin --> <!-- Step 3 End --> </div>
<!-- Instructions Row End --> <!-- Instructions Row Begin -->
<div style="width: 100%; margin-bottom: 20px; float: left;"> <!-- Step 4 Begin -->
<div class="cp-subleft-section"><img width="300" alt="" src="{{media url=westcottbrand/Monogram-Greeting-Card/mgc_step3.jpg}}" usemap="2116" title="mgc_step3.jpg">
<p>3) Then use the trimmer to cut another piece of contrasting cardstock for your monogram embellishment. Use the Westcott 18" Stainless Steel Ruler to determine the measurement for the embellishment. You want to leave about .5" of space around the letter. Then adhere the LetterCraft Permanent Vinyl Lettering in place.</p>
</div>
<!-- Step 1 End --> <!-- Step 2 Begin -->
<div class="cp-subright-section"><img width="300" alt="" src="{{media url=westcottbrand/Monogram-Greeting-Card/mgc_step4.jpg}}" usemap="2117" title="mgc_step4.jpg">
<p>4) With the Westcott Titanium Non-Stick 8" Straight Scissors, cut four pieces of foam tape and position them on the back of the monogram embellishment in the corners. Then peel of the paper backing from the foam pieces and position the monogram embellishment onto the front of the card.</p>
</div>
<!-- Step 4 End --> </div>
<!-- Instructions Row End --> <!-- Footer Text Begin -->
<div style="text-align: center; width: 100%; margin-bottom: 20px; float: left;">
<p>Adult supervision is recommended when children use scissors.<br>
© 2016 Acme United Corporation. Text and design by Marisa Pawelko</p>
</div>
</div>
</div>

Shredded Gift Bag
<div class="default CP-wrapper" id="page-content">
<div class="clearfix"> <!-- Blue Materials Box BEGIN -->
<div id="CP_main-container"> <!-- Final Project Image Begin -->
<div class="cp-subcat-mainimg"><img alt="" src="{{media url=westcottbrand/Shredded-Gift-Bag/shreddedgiftbag.jpg}}" usemap="2113" title="shreddedgiftbag.jpg"></div>
<!-- Final Project Image End -->
<p><strong>Summary: </strong><br>
Take an ordinary gift bag and make it extraordinary with the help of The World's Favorite Scissors™! This upcycled gift bag gets the party going with a festive piñata theme. Customize it with different colors to suit the occasion or recipients individual sense of style!</p>
<div class="what-need">
<p><strong>What's Needed:</strong></p>
<ul style="font-size:12px;line-height:20px;">
<li><a target="_blank" href="{{store direct_url="catalogsearch/result/?q=15751"}}">Westcott Trendsetter Zebra Scissors #15751</a></li>
<li> <a target="_blank" href="{{store direct_url="catalogsearch/result/?q=15471"}}">Westcott All Purpose Shredding Scissor #15471</a> </li>
<li> Westcott Self-Healing Cutting Mat 24" x 36"#15352</li>
<li> Plain Gift Bag </li>
<li> Tissue Paper </li>
<li> Glue Runner </li>
</ul>
</div>
<p style="text-align:center;margin-top:5px;float:left;width:100%;clear:both;"><em>Brought to you by Westcott – The World's Favorite Scissors</em></p>
<!-- Free Scissors Banner Begin --> <!-- Free Scissors Banner End --> </div>
<!-- Blue Materials Box END --> <!-- Instructions Row Begin -->
<div style="width: 100%; margin-bottom: 20px; float: left;"> <!-- Step 1 Begin -->
<p><strong>Steps:</strong></p>
<div class="cp-subleft-section"><img width="300" alt="" src="{{media url=westcottbrand/Shredded-Gift-Bag/sgb_step1.jpg}}" usemap="2114" title="sgb_step1.jpg">
<p>1) Layer up 3 sheets of tissue paper. Line up the edges and fold over onto a 2" strip, using the Westcott Self Healing Mat as a guide. Then carefully trim with the Westcott Trendsetter Zebra Scissors.</p>
</div>
<!-- Step 1 End --> <!-- Step 2 Begin -->
<div class="cp-subright-section"><img width="300" alt="" src="{{media url=westcottbrand/Shredded-Gift-Bag/sgb_step2.jpg}}" usemap="2115" title="sgb_step2.jpg">
<p>2) With the Westcott All Purpose Shredding Scissor, shred the edges of all 3 of the tissue paper strips at once, working your way down the strip.</p>
</div>
<!-- Step 2 End --> <!-- Step 3 Begin --> <!-- Step 3 End --> </div>
<!-- Instructions Row End --> <!-- Instructions Row Begin -->
<div style="width: 100%; margin-bottom: 20px; float: left;"> <!-- Step 4 Begin -->
<div class="cp-subleft-section"><img width="300" alt="" src="{{media url=westcottbrand/Shredded-Gift-Bag/sgb_step3.jpg}}" usemap="2116" title="sgb_step3.jpg">
<p>3) Separate the tissue paper strips. Then fold over the folded edge. This will give you a nice area to apply the glue runner adhesive.</p>
</div>
<!-- Step 1 End --> <!-- Step 2 Begin -->
<div class="cp-subright-section"><img width="300" alt="" src="{{media url=westcottbrand/Shredded-Gift-Bag/sgb_step4.jpg}}" usemap="2117" title="sgb_step4.jpg">
<p>4) Run the glue runner down the length of a tissue paper strip and adhere the first strip to the bag, starting with the bottom strip. Wrap the strip all the way around the bag and trim as needed. For this bag we used 3 strips of shredded tissue paper, but feel free to mix it up and add as many strips as you like. You could even cover the whole bag if you're feeling super ambitious!</p>
</div>
<!-- Step 4 End --> </div>
<!-- Instructions Row End --> <!-- Footer Text Begin -->
<div style="text-align: center; width: 100%; margin-bottom: 20px; float: left;">
<p>Adult supervision is recommended when children use scissors.<br>
© 2016 Acme United Corporation. Text and design by Marisa Pawelko</p>
</div>
</div>
</div>
Cat Nip Craft
<div id="page-content" class="default CP-kids-wrapper">
<div class="clearfix">
<!-- Blue Materials Box BEGIN -->
<div id="CP_kidmain-container"><!-- Final Project Image Begin -->
<div class="cp-subcat-mainimg"><img alt="Cat Nip Craft" src="{{media url=wysiwyg/CNC_Playtime4.jpg}}" /></div>
<!-- Final Project Image End -->
<p style="margin-bottom: 0;"><strong>Summary: </strong>Make the perfect gift for your furry friend using Westcott products!</p>
<div class="material-resource">
<div class="material">
<p style="margin-bottom: 0;"><strong>What's Needed:</strong></p>
<ul>
<li><a href="{{store direct_url="catalogsearch/result/?q=16550"}}" target="_blank">Westcott 8" Non-Stick Straight Scissors</a></li>
<li><a href="{{store direct_url="catalogsearch/result/?q=10415"}}" target="_blank">Westcott 12" Stainless Steel Ruler</a></li>
<li> Pen</li>
<li> Empty Toilet Paper Roll </li>
<li> Cat Treats </li>
</ul>
<p style="margin-bottom: 0;"> </p>
</div>
<div class="resource">
<p style="margin-bottom: 0;"><strong>Helpful Resources:<br /></strong>
<a title="Scissor Caddies" href="{{store direct_url="products/scissors/kids-scissors/scissor-caddy.html"}}"><img alt="Scissor Caddies" src="{{media url=westcottbrand/CAbuttonscissorcaddy.jpg}}" /><br /></a>
<a title="Teachers Scissors" href="{{store direct_url="products/scissors.html"}}"><img alt="Teachers Scissors" src="{{media url=westcottbrand/CAbuttonteacherscissors.jpg}}" usemap="https://www.cudabrand.com/media/2072" /><br /></a>
<a title="Kids Scissor Packs" href="{{store direct_url="products/scissors/kids-scissors/anti-microbial-product-protected-scissors.html"}}"><img alt="Kids Scissor Packs" src="{{media url=westcottbrand/CAbuttonkidsscissorpack.jpg}}" /></a>
</p>
</div>
<p> </p>
<p style="text-align: center;"> </p>
<!-- Free Scissors Banner Begin --> <!-- Free Scissors Banner End --></div>
<p style="text-align: center; clear:both;"><em>Brought to you by Westcott – The World’s Favorite Scissors</em></p>
<!-- Blue Materials Box END --> <!-- Instructions Row Begin -->
<div style="width: 100%; margin-bottom: 20px; float: left;"><!-- Step 1 Begin -->
<div class="cp-subleft-section"><img alt="Cat Nip Craft" src="{{media url=wysiwyg/CNC_Materials.jpg}}" width="300" />
<p><strong>Step 1</strong><br />
Gather your materials</p>
</div>
<!-- Step 1 End --> <!-- Step 2 Begin -->
<div class="cp-subright-section"><img alt="Cat Nip Craft" src="{{media url=wysiwyg/CNC_Step1.jpg}}" width="300" />
<p><strong>Step 2</strong><br />
Measure and mark 4 lines a half inch apart with your Westcott 12" Stainless Steel Ruler.</p>
</div>
<!-- Step 2 End --> <!-- Step 3 Begin -->
<div class="cp-subleft-section"><img alt="Cat Nip Craft" src="{{media url=wysiwyg/CNC_Step2.jpg}}" width="300" />
<p><strong>Step 3</strong><br />
Next, cut along the lines with your Westcott 8" Non-Stick Titanium Bonded Scissors (you will end up with 4 rings)</p>
</div>
<!-- Step 3 End --> <!-- Step 3 Begin -->
<!-- Step 3 End --> <!-- Step 3 Begin -->
<div class="cp-subright-section"><img alt="Cat Nip Craft" src="{{media url=wysiwyg/CNC_Step3.jpg}}" width="300" />
<p><strong>Step 4</strong><br />
Insert one ring into the second ring. Third into the fourth ring</p>
</div>
<!-- Step 4 End --> <!-- Step 3 Begin -->
<!-- Step 4 End --> <!-- Step 3 Begin -->
<div class="cp-subleft-section"><img alt="Cat Nip Craft" src="{{media url=wysiwyg/CNC_Step5.jpg}}" width="300" />
<p><strong>Step 5</strong><br />
Decorate and drop in the cat treats! Then give to your pet for play time!</p>
</div>
<!-- Step 5 End --> <!-- Step 3 Begin -->
</div>
<div style="text-align: center; width: 100%; margin-bottom: 20px; float: left;">
<p>Adult supervision is recommended when children use scissors.<br>
© 2017 Acme United Corporation. Text and design by Marisa Pawelko</p>
</div>
</div>
</div>
