Fashion

Fashion
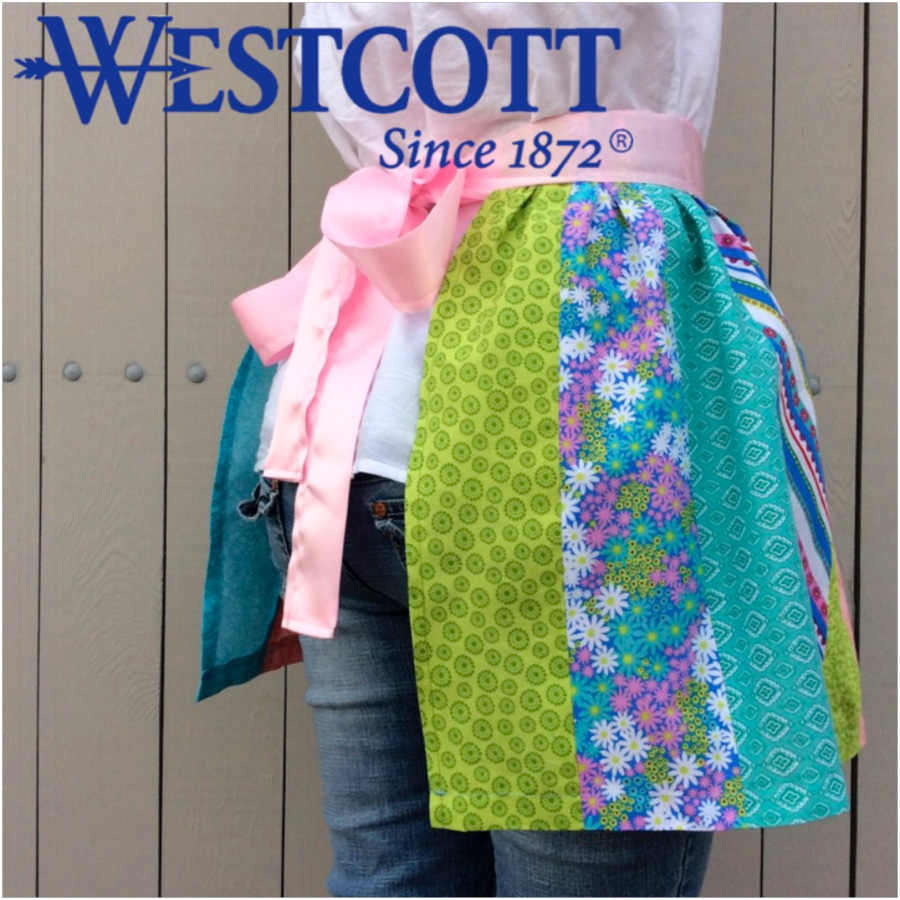
Easy Patchwork Apron
<div class="default CP-wrapper" id="page-content">
<div class="clearfix"> <!-- Blue Materials Box BEGIN -->
<div id="CP_main-container"> <!-- Final Project Image Begin -->
<div class="cp-subcat-mainimg"><img alt="" src="{{media url=westcottbrand/Easy-Patchwork-Apron/PatchworkApronprimaryimage.jpg}}" usemap="2113" title="Patchwork Apron Primary"/></div>
<!-- Final Project Image End -->
<p><strong>Summary: </strong><br>
This quick and easy patchwork apron project makes great use of your leftover fabric scraps! Use The World's Favorite Scissors™ to create this cute customized accessory for children or adults! Perfect for crafting, cooking in the kitchen or even rock this apron out in public over a pair of jeans for a super cute, country chic look!</p>
<div class="what-need">
<p><strong>What's Needed:</strong></p>
<ul style="font-size:12px;line-height:20px;">
<li> <a target="_blank" href="{{store direct_url="westcott-extremedge-adjustable-tension-titanium-bonded-scissors-9-bent-gray-14669-parent.html"}}">Westcott ExtremEdge Adjustable Tension Titanium Bonded Scissors, 9" </a></li>
<li> Westcott Craft Self Healing Cutting Mat, 12" x 18"</li>
<li> Cotton Fabric Scraps (enough to cut out 14 rectangles that are 4.5" x 18") </li>
<li> Satin Blanket Binding </li>
<li> Sewing Thread </li>
<li> Sewing Machine </li>
<li> Stick Pins </li>
<li> Iron & Ironing Board </li>
</ul>
</div>
<p style="text-align:center;margin-top:5px;float:left;width:100%;clear:both;"><em>Brought to you by Westcott – The World's Favorite Scissors</em></p>
<!-- Free Scissors Banner Begin --> <!-- Free Scissors Banner End --> </div>
<!-- Blue Materials Box END --> <!-- Instructions Row Begin -->
<div style="width: 100%; margin-bottom: 20px; float: left;"> <!-- Step 1 Begin -->
<p><strong>Steps:</strong></p>
<div class="cp-subleft-section"><img alt="" src="{{media url=westcottbrand/Easy-Patchwork-Apron/PatchworkApronStepOut1.jpg}}" usemap="2114" title="Patchwork Apron 1">
<p>1) Select a variety of fabrics that compliment each other. In this case we chose 7 different fabrics in springtime colors.</p>
</div>
<!-- Step 1 End --> <!-- Step 2 Begin -->
<div class="cp-subright-section"><img alt="" src="{{media url=westcottbrand/Easy-Patchwork-Apron/PatchworkApronStepOut2.jpg}}" usemap="2115" title="Patchwork Apron 2">
<p>2) Lay the fabric onto the cutting mat, lining up the raw edges. Using the mat as a guide, cut through all the layers of fabric at once. You are going to cut 14 rectangular strips of fabric that measure 4.5" x 18". The Westcott ExtremEdge Scissors are perfect for cutting through multiple layers of fabric at once and feature adjustable tension for your cutting comfort! </p>
</div>
<!-- Step 2 End --> <!-- Step 3 Begin --> <!-- Step 3 End --> </div>
<!-- Instructions Row End --> <!-- Instructions Row Begin -->
<div style="width: 100%; margin-bottom: 20px; float: left;"> <!-- Step 4 Begin -->
<div class="cp-subleft-section"><img alt="" src="{{media url=westcottbrand/Easy-Patchwork-Apron/PatchworkApronStepOut3.jpg}}" usemap="2116" title="Patchwork Apron 3">
<p>3) Stitch the strips together with a ½" seam allowance and iron the seams flat. Then cut the blanket binding to your desired length, depending on the size you want your bow to be in the back.</p>
</div>
<!-- Step 1 End --> <!-- Step 2 Begin -->
<div class="cp-subright-section"><img alt="" src="{{media url=westcottbrand/Easy-Patchwork-Apron/PatchworkApronStepOut4.jpg}}" usemap="2117" title="Patchwork Apron 4">
<p>4) Hem the bottom and sides of the sewn panel. To create the gathers for the waistband, sew three parallel rows of basting stitches along the remaining raw edge of the panel. Be sure to leave the threads long at the beginning and end of each row, and do <span style="text-decoration: underline;">not</span> backstitch. Pull on the threads to gather the fabric to your desired width. For our apron, we gathered to a width of 23". Tie knots on the loose threads to secure the width then even out the gathers by working through with your fingers. Press the gathers flat. Fold, press and tuck under the raw ends of the blanket binding. Pin the blanket binding over the gathered section (be sure to center the two) and stitch the two pieces together, running your stitching all the way down the length of the blanket binding. And lastly, stitch the ends of the blanket binding closed.</p>
</div>
<!-- Step 4 End --> </div>
<!-- Instructions Row End --> <!-- Footer Text Begin -->
<div style="text-align: center; width: 100%; margin-bottom: 20px; float: left;">
<p>Adult supervision is recommended when children use scissors.<br>
© 2016 Acme United Corporation. Text and design by Marisa Pawelko</p>
</div>
</div>
<!--[if IE 7]> <div class="clear"></div> <![endif]--> </div>

Hair Ties
<div class="default CP-wrapper" id="page-content">
<div class="clearfix"> <!-- Blue Materials Box BEGIN -->
<div id="CP_main-container"> <!-- Final Project Image Begin -->
<div class="cp-subcat-mainimg"><img alt="" src="{{media url=westcottbrand/Hair-Ties/hairtiesmain.jpg}}" usemap="2187" title="hairtiesmain.jpg"></div>
<p> <!-- Final Project Image End --> <strong>Summary: </strong><br>
Easily create your own trendy elastic hair ties with The World's Favorite Scissors! These are great for little add-on gifts and look super cute with a ponytail or when worn on the wrist like a bracelet!</p>
<div class="what-need">
<p><strong>What's Needed:</strong></p>
<ul style="font-size:12px;line-height:20px;">
<li>Patterned Elastic</li>
<li>Westcott Self-Healing Cutting Mat #15352</li>
<li>The World's Favorite Scissors™ <br>
<a target="_blank" href="{{store direct_url="westcott-8-extremedge-titanium-bent-soft-handle-scissors-15351-parent.html"}}">Westcott Titanium Bonded 8" ExtremEdge Bent Scissors #15351</a></li>
</ul>
</div>
<p style="text-align:center;margin-top:5px;float:left;width:100%;clear:both;"><span style="font-style: italic;">Brought to you by Westcott – The World's Favorite Scissors</span></p>
</div>
<!-- Blue Materials Box END --> <!-- Instructions Row Begin -->
<div style="width: 100%; margin-bottom: 20px; float: left;"> <!-- Step 1 Begin -->
<p><strong>Steps:</strong></p>
<div class="cp-subleft-section"><img width="300" alt="" src="{{media url=westcottbrand/Hair-Ties/hairties1.jpg}}" usemap="2188" title="hairties1.jpg">
<p>1) Lay the elastic onto the Westcott Self-Healing Cutting Mat.</p>
</div>
<!-- Step 1 End --> <!-- Step 2 Begin -->
<div class="cp-subright-section"><img width="300" alt="" src="{{media url=westcottbrand/Hair-Ties/hairties2.jpg}}" usemap="2189" title="hairties2.jpg">
<p>2) Use the Westcott Self-Healing Cutting Mat to measure out and cut the pieces to 10" lengths with the Westcott Titanium Bonded 8" ExtremEdge Bent Scissors. OPTIONAL: You could also cut longer ones to use as headbands.</p>
</div>
<!-- Step 2 End --> <!-- Step 3 Begin --> <!-- Step 3 End --> </div>
<!-- Instructions Row End --> <!-- Instructions Row Begin -->
<div style="width: 100%; margin-bottom: 20px; float: left;"> <!-- Step 4 Begin -->
<div class="cp-subleft-section"><img width="300" alt="" src="{{media url=westcottbrand/Hair-Ties/hairties3.jpg}}" usemap="2190" title="hairties3.jpg">
<p>3) Fold the pieces over and tie the ends in a simple knot. Lastly, trim the excess elastic at a 45 degree angle with the Westcott Titanium Bonded 8" ExtremEdge Bent Scissors.</p>
</div>
<!-- Step 3 End --> <!-- Step 4 Begin -->
<div style="width: 300px; float: left; margin-right: 40px;">
<p> </p>
</div>
<!-- Step 4 End --> </div>
<!-- Instructions Row End --> <!-- Footer Text Begin -->
<div style="text-align: center; width: 100%; margin-bottom: 20px; float: left;">
<p>Adult supervision is recommended when children use scissors.<br>
© 2016 Acme United Corporation. Text and design by Marisa Pawelko</p>
</div>
</div>
<!--[if IE 7]> <div class="clear"></div> <![endif]--> </div>
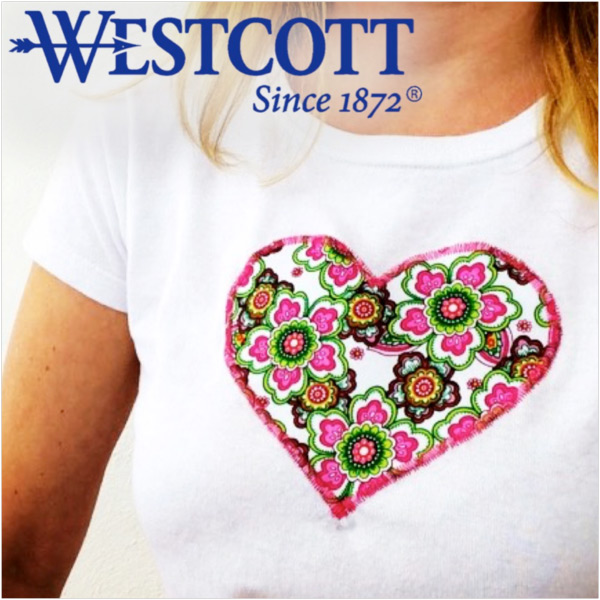
Stencil Applique Top
<div class="default CP-wrapper" id="page-content">
<div class="clearfix"> <!-- Blue Materials Box BEGIN -->
<div id="CP_main-container"> <!-- Final Project Image Begin -->
<div class="cp-subcat-mainimg"><img alt="" src="{{media url=westcottbrand/Stencil-Applique-Top/stencilappliquetopmain.jpg}}" usemap="2191" title="stencilappliquetopmain.jpg"></div>
<p> <!-- Final Project Image End --> <strong>Summary: </strong><br>
Easily create your own fashion embellishments with applique! Choose from over 70 different stencils in the Westcott LetterCraft Stencil Book to create custom appliques for t-shirts, aprons, bags, scarves and more!</p>
<div class="what-need">
<p><strong>What's Needed:</strong></p>
<ul style="font-size:12px;line-height:20px;">
<li>Westcott LetterCraft Stencil Book</li>
<li>T-Shirt or other blank fabric item</li>
<li>Accent Fabric For Applique</li>
<li>Iron On Fusible Webbing</li>
<li>Sewing Machine</li>
<li>Sewing Thread</li>
<li>Sewing Pins</li>
<li>Iron</li>
<li>Tailors Chalk or Lightly Colored Pencil</li>
<li>The World's Favorite Scissors™ <br>
<a target="_blank" href="{{store direct_url="westcott-8-extremedge-titanium-bent-soft-handle-scissors-15351-parent.html"}}">Westcott Titanium Bonded 8" ExtremEdge Bent Scissors #15351 </a><br>
<a target="_blank" href="{{store direct_url="westcott-3-titanium-straight-scissor-violet-15150-parent.html"}}">Westcott Titanium Bonded 3" Straight Scissors #15150 </a></li>
</ul>
<div> </div>
</div>
<p style="text-align:center;margin-top:5px;float:left;width:100%;clear:both;"><em>Brought to you by Westcott – The World's Favorite Scissors</em> <!-- Free Scissors Banner Begin --> <!-- Free Scissors Banner End --> </p>
</div>
<!-- Blue Materials Box END --> <!-- Instructions Row Begin -->
<div style="width: 100%; margin-bottom: 20px; float: left;"> <!-- Step 1 Begin -->
<p><strong>Steps:</strong></p>
<div class="cp-subleft-section"><img width="300" alt="" src="{{media url=westcottbrand/Stencil-Applique-Top/stencilappliquetop1.jpg}}" usemap="2192" title="stencilappliquetop1.jpg">
<p>1) To determine your applique design, select a stencil from the Westcott LetterCraft Stencil Book. All of the designs come in 4 different sizes so feel free to incorporate the different sizes, or mix and match the different shapes.</p>
</div>
<!-- Step 1 End --> <!-- Step 2 Begin -->
<div class="cp-subright-section"><img width="300" alt="" src="{{media url=westcottbrand/Stencil-Applique-Top/stencilappliquetop2.jpg}}" usemap="2193" title="stencilappliquetop2.jpg">
<p>2) For this project we used the large heart shaped stencil. Simply layer your accent fabric on top of the fusible webbing and pin the two layers together. Then trace the stencil onto the fabric with tailors chalk or a lightly colored pencil.</p>
</div>
<!-- Step 2 End --> <!-- Step 3 Begin --> <!-- Step 3 End --> </div>
<!-- Instructions Row End --> <!-- Instructions Row Begin -->
<div style="width: 100%; margin-bottom: 20px; float: left;"> <!-- Step 4 Begin -->
<div class="cp-subleft-section"><img width="300" alt="" src="{{media url=westcottbrand/Stencil-Applique-Top/stencilappliquetop3.jpg}}" usemap="2194" title="stencilappliquetop3.jpg">
<p>3) Next cut the shape out with you Westcott Titanium Bonded 8" ExtremEdge Bent Scissors, cutting both the fabric and the fusible webbing at the same time. Then you are ready to iron the shape onto your garment.</p>
</div>
<!-- Step 3 End --> <!-- Step 4 Begin -->
<div class="cp-subright-section"><img width="300" alt="" src="{{media url=westcottbrand/Stencil-Applique-Top/stencilappliquetop4.jpg}}" usemap="2195" title="stencilappliquetop4.jpg">
<p>4) Once you've ironed your applique in place, use a sewing machine to topstitch the border of the fabric shape with a wide and tight zig-zag stitch. Lastly, trim away any excess threads with your Westcott Titanium Bonded 3" Straight Scissors.</p>
</div>
<!-- Step 4 End --> </div>
<!-- Instructions Row End --> <!-- Footer Text Begin -->
<div style="text-align: center; width: 100%; margin-bottom: 20px; float: left;">
<p>Adult supervision is recommended when children use scissors.<br>
© <!--<script type="text/javascript">// var today = new Date(); // var year = today.getFullYear(); // document.write(year)</script>-->2015 Acme United Corporation. Text and design by Marisa Pawelko</p>
</div>
</div>
<!--[if IE 7]> <div class="clear"></div> <![endif]--> </div>
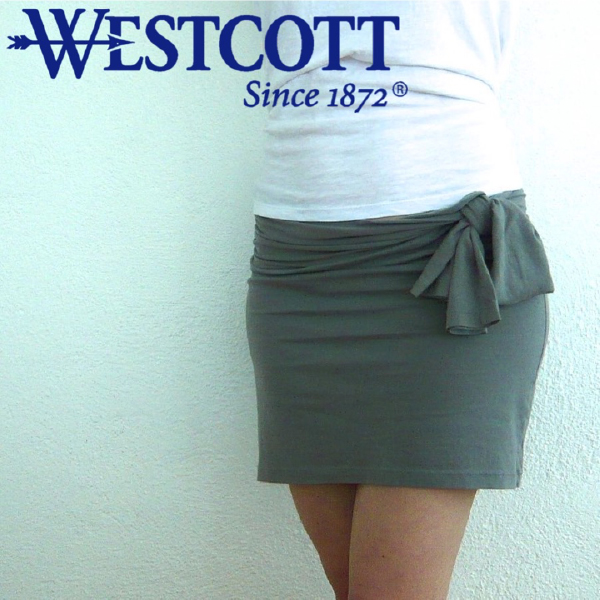
Shirt Skirt
<div class="default CP-wrapper" id="page-content">
<div class="clearfix"> <!-- Blue Materials Box BEGIN -->
<div id="CP_main-container"> <!-- Final Project Image Begin -->
<div class="cp-subcat-mainimg"><img alt="" src="{{media url=westcottbrand/Shirt-Skirt/shirtskirt.jpg}}" usemap="2113" title="shirtskirt.jpg"></div>
<!-- Final Project Image End -->
<p><strong>Summary: </strong><br>
Update your winter wardrobe for summer styles! Take an ordinary long sleeve shirt from drab to fab with this fun and easy t-shirt remix project!</p>
<div class="what-need">
<p><strong>What's Needed:</strong></p>
<ul style="font-size:12px;line-height:20px;">
<li> <a target="_blank" href="{{store direct_url="westcott-8-extremedge-titanium-bent-soft-handle-scissors-15351-parent.html"}}">Westcott 8" ExtremEdge Bent Scissors #15351</a></li>
<li> <a target="_blank" href="{{store direct_url="westcott-3-titanium-straight-scissor-violet-15150-parent.html"}}">Westcott 3" Straight Scissors #15150</a> </li>
<li> Long Sleeve T-Shirt </li>
<li> Stick Pins </li>
<li> Sewing Thread </li>
<li> Sewing Machine (optional) </li>
</ul>
</div>
<p style="text-align:center;margin-top:5px;float:left;width:100%;clear:both;"><em>Brought to you by Westcott – The World's Favorite Scissors</em></p>
<!-- Free Scissors Banner Begin --> <!-- Free Scissors Banner End --> </div>
<!-- Blue Materials Box END --> <!-- Instructions Row Begin -->
<div style="width: 100%; margin-bottom: 20px; float: left;"> <!-- Step 1 Begin -->
<p><strong>Steps:</strong></p>
<div class="cp-subleft-section"><img width="300" alt="" src="{{media url=westcottbrand/Shirt-Skirt/ss_step1.jpg}}" usemap="2114" title="ss_step1.jpg">
<p>1) With the key provided adjust the tension of the Westcott 8" ExtremEdge Bent Scissors to suit for cutting comfort.</p>
</div>
<!-- Step 1 End --> <!-- Step 2 Begin -->
<div class="cp-subright-section"><img width="300" alt="" src="{{media url=westcottbrand/Shirt-Skirt/ss_step2.jpg}}" usemap="2115" title="ss_step2.jpg">
<p>2) Lay down your long sleeve t-shirt and cut off the sleeves and upper portion as shown.</p>
</div>
<!-- Step 2 End --> <!-- Step 3 Begin --> <!-- Step 3 End --> </div>
<!-- Instructions Row End --> <!-- Instructions Row Begin -->
<div style="width: 100%; margin-bottom: 20px; float: left;"> <!-- Step 4 Begin -->
<div class="cp-subleft-section"><img width="300" alt="" src="{{media url=westcottbrand/Shirt-Skirt/ss_step3.jpg}}" usemap="2116" title="ss_step3.jpg">
<p>3) Trim the sleeves at a 90 degree angle.</p>
</div>
<!-- Step 1 End --> <!-- Step 2 Begin -->
<div class="cp-subright-section"><img width="300" alt="" src="{{media url=westcottbrand/Shirt-Skirt/ss_step4.jpg}}" usemap="2117" title="ss_step4.jpg">
<p>4) With your sewing machine (or if you prefer you can sew by hand) use a basting stitch to gather the wide ends of the sleeves. Trim any loose threads with the Westcott 3" Straight Scissors. Stitch the gathered ends of the sleeves to the top of the remaining portion of the shirt on each side. Try on the skirt and adjust the fit by tying the loose ends of the sleeves off to one side to create a stylish sash!</p>
</div>
<!-- Step 4 End --> </div>
<!-- Instructions Row End --> <!-- Footer Text Begin -->
<div style="text-align: center; width: 100%; margin-bottom: 20px; float: left;">
<p>Adult supervision is recommended when children use scissors.<br>
© 2016 Acme United Corporation. Text and design by Marisa Pawelko</p>
</div>
</div>
<!--[if IE 7]> <div class="clear"></div> <![endif]--> </div>
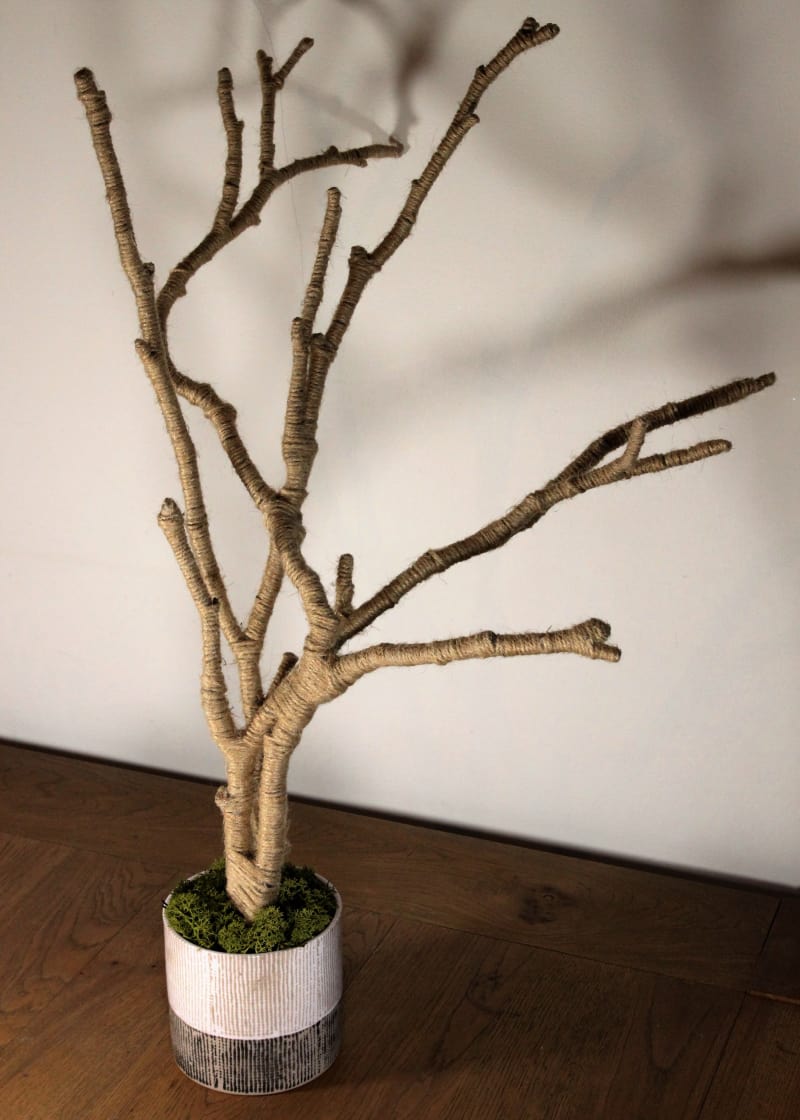
Jewelry Tree
<div id="page-content" class="default CP-kids-wrapper">
<div class="clearfix"><!-- Blue Materials Box BEGIN -->
<div id="CP_kidmain-container"><!-- Final Project Image Begin -->
<div class="cp-subcat-mainimg"><img alt="Jewelry Tree" src="{{media url=wysiwyg/jewelrytree_step_5.jpg}}" /></div>
<!-- Final Project Image End -->
<p style="margin-bottom: 0;"><strong>Summary: </strong>Put your earrings and necklaces on display with this decorative piece, a cute addition to your dresser or bathroom counter!</p>
<div class="material-resource">
<div class="material">
<p style="margin-bottom: 0;"><strong>What's Needed:</strong></p>
<ul>
<li>3 branches, around 1 cm thick</li>
<li><a href="{{store direct_url="products/glue-guns.html"}}" target="_blank">Westcott Hot Glue Gun and Glue Sticks</a></li>
<li>Twine</li>
<li><a href="{{store direct_url="products/scissors.html"}}" target="_blank">Westcott Scissors</a></li>
<li>Plaster of paris</li>
<li>Water</li>
<li>A stick to stir the plaster of paris</li>
<li>Container for base (ceramic plant pot, with no hole in the base)</li>
<li>Strong tape (optional)</li>
<li>Moss for decoration (optional)</li>
</ul>
<p style="margin-bottom: 0;"> </p>
</div>
<div class="resource">
<p style="margin-bottom: 0;"><strong>Helpful Resources:<br /></strong>
<a title="Scissor Caddies" href="{{store direct_url="products/scissors/kids-scissors/scissor-caddy.html"}}"><img alt="Scissor Caddies" src="{{media url=westcottbrand/CAbuttonscissorcaddy.jpg}}" /><br /></a>
<a title="Teachers Scissors" href="{{store direct_url="products/scissors.html"}}"><img alt="Teachers Scissors" src="{{media url=westcottbrand/CAbuttonteacherscissors.jpg}}" usemap="https://www.cudabrand.com/media/2072" /><br /></a>
<a title="Kids Scissor Packs" href="{{store direct_url="products/scissors/kids-scissors/anti-microbial-product-protected-scissors.html"}}"><img alt="Kids Scissor Packs" src="{{media url=westcottbrand/CAbuttonkidsscissorpack.jpg}}" /></a>
</p>
</div>
<p> </p>
<p style="text-align: center;"> </p>
<!-- Free Scissors Banner Begin --> <!-- Free Scissors Banner End --></div>
<p style="text-align: center; clear: both;"><em>Brought to you by Westcott – The World’s Favorite Scissors</em></p>
<!-- Blue Materials Box END --> <!-- Instructions Row Begin -->
<div style="width: 100%; margin-bottom: 20px; float: left;"><!-- Step 1 Begin -->
<div class="cp-subleft-section"><img alt="Jewelry Tree" src="{{media url=wysiwyg/jewelrytree_step_1.jpg}}" width="300" />
<p><strong>Step 1</strong><br /> Strip any loose bark away from the branches, rinse away any soil, and allow to fully dry indoors next to a radiator.</p>
</div>
<!-- Step 1 End --> <!-- Step 2 Begin -->
<div class="cp-subright-section"><img alt="Jewelry Tree" src="{{media url=wysiwyg/jewelrytree_step_2.jpg}}" width="300" />
<p><strong>Step 2</strong><br /> Gather branches and tape them together at the base. You can cheat a little by using the Westcott Glue Gun and tape to add extra twigs where needed! Cut twine into manageable lengths, and apply the glue, using your Westcott Glue Gun, in a strip along the branch, approximately 1 cm at a time. Wrap twine, then add more glue further along the branch, and so on.</p>
</div>
<!-- Step 2 End --> <!-- Step 3 Begin -->
<div class="cp-subleft-section"><img alt="Jewelry Tree" src="{{media url=wysiwyg/jewelrytree_step_3.jpg}}" width="300" />
<p><strong>Step 3</strong><br /> Once branches are fully wrapped, mix the plaster of paris and water into your chosen base. Leave space for decoration once dry, to hide the plaster. Stand branches upright and support against a wall.</p>
</div>
<!-- Step 3 End --> <!-- Step 4 Begin -->
<div class="cp-subright-section"><img alt="Jewelry Tree" src="{{media url=wysiwyg/jewelrytree_step_4.jpg}}" width="300" />
<p><strong>Step 4</strong><br /> Once plaster is fully dry, drizzle some glue to the plaster and add some reindeer moss for decoration. Sand, soil or pebbles are other options.</p>
</div>
<!-- Step 4 End --> <!-- Step 5 Begin -->
<div class="cp-subleft-section"><img alt="Jewelry Tree" src="{{media url=wysiwyg/jewelrytree_step_5.jpg}}" width="300" />
<p><strong>Step 5</strong><br /> Finished! Enjoy your new bespoke jewelry tree.</p>
</div>
<!-- Step 5 End --></div>
<div style="text-align: center; width: 100%; margin-bottom: 20px; float: left;">
<p>Adult supervision is recommended when children use scissors</br>© 2017 Acme United Corporation.</p>
</div>
</div>
</div>
</div>
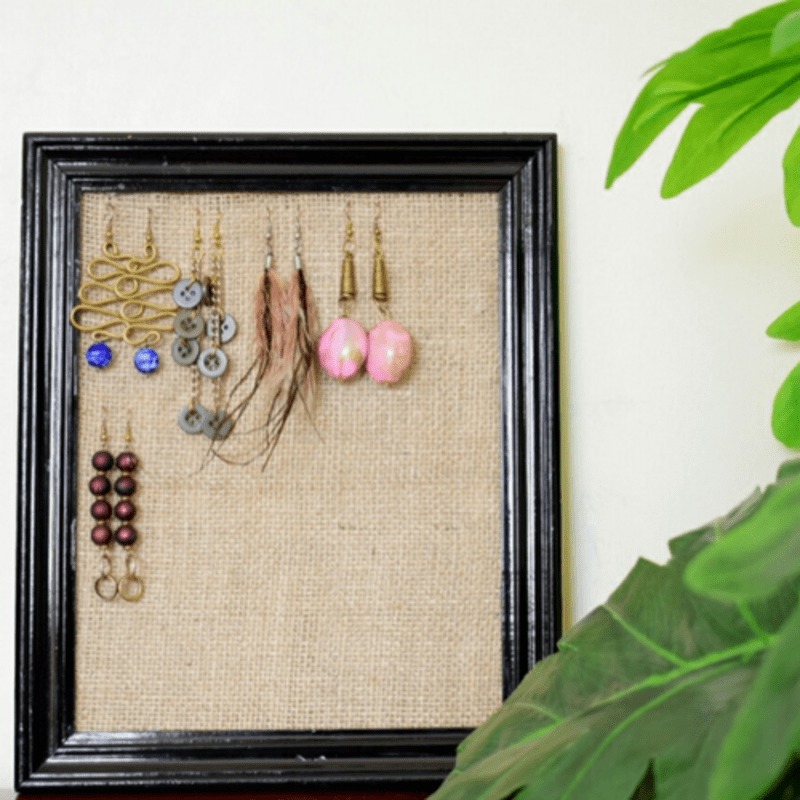
Burlap Accessories Holder
<div id="page-content" class="default CP-kids-wrapper">
<div class="clearfix">
<!-- Blue Materials Box BEGIN -->
<div id="CP_kidmain-container"><!-- Final Project Image Begin -->
<div class="cp-subcat-mainimg"><img alt="Burlap Accessories Holder" src="{{media url=wysiwyg/burlap_accessories_holder_step_4.png}}" /></div>
<!-- Final Project Image End -->
<p style="margin-bottom: 0;"><strong>Summary: </strong>This holder is perfect for organizing jewelry. Hang your earrings, both dangly and studs, on a beautiful display. The burlap fabric is perfect, because of the tiny holes that make it easy for hanging your earrings. You could use any sheer fabric as well!</p>
<div class="material-resource">
<div class="material">
<p style="margin-bottom: 0;"><strong>What's Needed:</strong></p>
<ul>
<li><a href="{{store direct_url="products/glue-guns.html"}}" target="_blank">Westcott Hot Glue Gun and Glue Sticks</a></li>
<li><a href="{{store direct_url="products/scissors.html"}}" target="_blank">Westcott Scissors</a></li>
<li>Burlap Fabric</li>
<li>Picture Frame</li>
</ul>
<p style="margin-bottom: 0;"> </p>
</div>
<div class="resource">
<p style="margin-bottom: 0;"><strong>Helpful Resources:<br />
</strong> <a title="Scissor Caddies" href="{{store direct_url="products/scissors/kids-scissors/scissor-caddy.html"}}"><img alt="Scissor Caddies" src="{{media url=westcottbrand/CAbuttonscissorcaddy.jpg}}" /><br />
</a> <a title="Teachers Scissors" href="{{store direct_url="products/scissors.html"}}"><img alt="Teachers Scissors" src="{{media url=westcottbrand/CAbuttonteacherscissors.jpg}}" usemap="https://www.cudabrand.com/media/2072" /><br />
</a> <a title="Kids Scissor Packs" href="{{store direct_url="products/scissors/kids-scissors/anti-microbial-product-protected-scissors.html"}}"><img alt="Kids Scissor Packs" src="{{media url=westcottbrand/CAbuttonkidsscissorpack.jpg}}" /></a> </p>
</div>
<p> </p>
<p style="text-align: center;"> </p>
<!-- Free Scissors Banner Begin --> <!-- Free Scissors Banner End -->
</div>
<p style="text-align: center; clear:both;"><em>Brought to you by Westcott – The World’s Favorite Scissors</em></p>
<!-- Blue Materials Box END --> <!-- Instructions Row Begin -->
<div style="width: 100%; margin-bottom: 20px; float: left;"><!-- Step 1 Begin -->
<div class="cp-subleft-section"><img alt="Burlap Accessories Holder" src="{{media url=wysiwyg/burlap_accessories_holder_step_1.png}}" width="300" />
<p><strong>Step 1</strong><br />
Plug in your Glue Gun and wait for it to heat up. It turns red when heated so that will tell you.</p>
</div>
<!-- Step 1 End --> <!-- Step 2 Begin -->
<div class="cp-subright-section"><img alt="Burlap Accessories Holder" src="{{media url=wysiwyg/burlap_accessories_holder_step_2.png}}" width="300" />
<p><strong>Step 2</strong><br />
Trim your burlap to fit the size of your picture frame using Westcott Scissors.</p>
</div>
<!-- Step 2 End --> <!-- Step 3 Begin -->
<div class="cp-subleft-section"><img alt="Burlap Accessories Holder" src="{{media url=wysiwyg/burlap_accessories_holder_step_3.png}}" width="300" />
<p><strong>Step 3</strong><br />
Use your hot Glue Gun to glue the burlap fabric on the back of the frame.</p>
</div>
<!-- Step 3 End --> <!-- Step 4 Begin -->
<div class="cp-subright-section"><img alt="Burlap Accessories Holder" src="{{media url=wysiwyg/burlap_accessories_holder_step_4.png}}" width="300" />
<p><strong>Step 4</strong><br />
Last, arrange your accessories and hang the frame then enjoy the beauty of your accessories!</p>
</div>
<!-- Step 4 End -->
</div>
<div style="text-align: center; width: 100%; margin-bottom: 20px; float: left;">
<p> Adult supervision is recommended when children use scissors.</br>
© 2017 Acme United Corporation. </p>
</div>
</div>
</div>
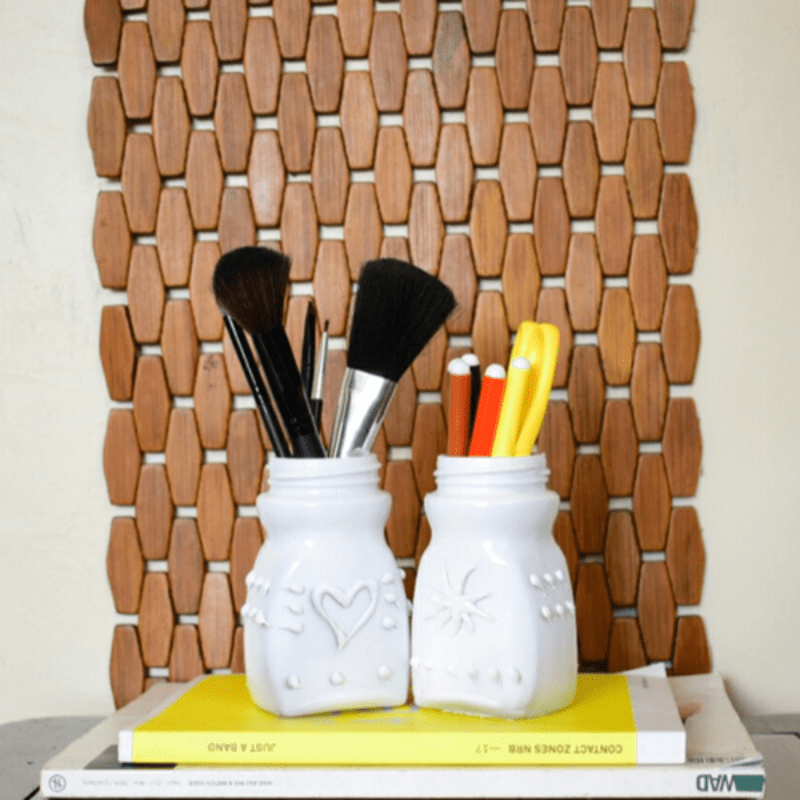
Glue Gun Containers
<div id="page-content" class="default CP-kids-wrapper">
<div class="clearfix"><!-- Blue Materials Box BEGIN -->
<div id="CP_kidmain-container"><!-- Final Project Image Begin -->
<div class="cp-subcat-mainimg"><img alt="Glue Gun Containers" src="{{media url=wysiwyg/glue_gun_container_step_3.png}}" /></div>
<!-- Final Project Image End -->
<p style="margin-bottom: 0;"><strong>Summary: </strong>Looking for a new way to decorate your home? Try upcycling with Westcott's new Hot Glue Gun! Repurpose an old glass container into a fabulous decorated vase!</p>
<div class="material-resource">
<div class="material">
<p style="margin-bottom: 0;"><strong>What's Needed:</strong></p>
<ul>
<li><a href="{{store direct_url="products/glue-guns.html"}}" target="_blank">Westcott Hot Glue Gun and Glue Sticks</a></li>
<li>Glass containers (or any container that can be painted)</li>
<li>Toilet Paper Roll</li>
<li>Spray paint (or acrylic paint)</li>
</ul>
<p style="margin-bottom: 0;"> </p>
</div>
<div class="resource">
<p style="margin-bottom: 0;"><strong>Helpful Resources:<br /></strong>
<a title="Scissor Caddies" href="{{store direct_url="products/scissors/kids-scissors/scissor-caddy.html"}}"><img alt="Scissor Caddies" src="{{media url=westcottbrand/CAbuttonscissorcaddy.jpg}}" /><br /></a>
<a title="Teachers Scissors" href="{{store direct_url="products/scissors.html"}}"><img alt="Teachers Scissors" src="{{media url=westcottbrand/CAbuttonteacherscissors.jpg}}" usemap="https://www.cudabrand.com/media/2072" /><br /></a>
<a title="Kids Scissor Packs" href="{{store direct_url="products/scissors/kids-scissors/anti-microbial-product-protected-scissors.html"}}"><img alt="Kids Scissor Packs" src="{{media url=westcottbrand/CAbuttonkidsscissorpack.jpg}}" /></a>
</p>
</div>
<p> </p>
<p style="text-align: center;"> </p>
<!-- Free Scissors Banner Begin --> <!-- Free Scissors Banner End --></div>
<p style="text-align: center; clear:both;"><em>Brought to you by Westcott – The World’s Favorite Scissors</em></p>
<!-- Blue Materials Box END --> <!-- Instructions Row Begin -->
<div style="width: 100%; margin-bottom: 20px; float: left;"><!-- Step 1 Begin -->
<div class="cp-subleft-section"><img alt="Glue Gun Containers" src="{{media url=wysiwyg/glue_gun_container_step_1.png}}" width="300" />
<p><strong>Step 1</strong><br /> Plug in your Glue Gun and wait for it to heat up. It turns red when heated so that will tell you.</p>
</div>
<!-- Step 1 End --> <!-- Step 2 Begin -->
<div class="cp-subright-section"><img alt="Glue Gun Containers" src="{{media url=wysiwyg/glue_gun_container_step_2.png}}" width="300" />
<p><strong>Step 2</strong><br /> Using your hot Glue Gun, draw on your preferred design. You can draw anything from designs to names, really just have fun with this. Wait for the glue to dry and get rid of the tiny strings of the hot glue.</p>
</div>
<!-- Step 2 End --> <!-- Step 3 Begin -->
<div class="cp-subleft-section"><img alt="Glue Gun Containers" src="{{media url=wysiwyg/glue_gun_container_step_3.png}}" width="300" />
<p><strong>Step 3</strong><br /> Spray paint your vase in your preferred color and your design will literally pop! Wait for the paint to dry and your containers are good for use!</p>
</div>
<!-- Step 3 End --> <!-- Step 3 Begin -->
</div>
<div style="text-align: center; width: 100%; margin-bottom: 20px; float: left;">
<p>Adult supervision is recommended when children use scissors.<br>
© 2017 Acme United Corporation. Text and design by Marisa Pawelko</p>
</div>
</div>
</div>
